Showing posts with label dessert. Show all posts

Saturday, September 1, 2012

Chocolate Chip Pizzert


So, last week my sweet middle child turned 4 years old.

I wanted to have a special dinner for him since his birthday party will not be for 2 more weeks.

His favorite food is Pizza, hands down.  The boy would live off of pizza.  So for his birthday I made - Pizza.  I also made a dessert pizza.  A pizzert to be exact.  The chocolate chip kind.  We all loved it.  It is worth your time to make.  And you can do it milk free if you have an allergy in your family.

Here is what you do.

Make your pizza dough.  roll it out and bake it for about 10 minutes at 400 degrees.
Sprinkle about 1/2 a box of yellow cake mix all over the pizza crust.  Drizzle on some melted margarine. And top the whole thing off with some chocolate chips.


Throw the pizzert back in the oven for about 12 minutes and smell the goodness happening.  

Stick a candle in there and.....

Make a wish...

and blow out the candle.

Happy Birthday Butter Beane.

Ingredients
One pizza dough ( I used this recipe)
1/2 box of Duncan Hines classic yellow cake mix (does not contain milk)
1 stick of margarine, melted (I used Fleishmann's unsalted because it has no milk)
About 1 cup of semi sweet chocolate chips (Gharidelli has no milk)

Directions
Bake the pizza crust for 10 minutes at 400 degrees
Sprinkle the dry cake mix on the pizza crust.  I use about 1/2 the box.  Get a good layer on there.
Sprinkle on your chocolate chips.
Drizzle the melted margarine all over the pizzert.

Bake at 400 degrees for about 10-12 minutes.

Let cool for just a minute and then slice and serve.  You won't be sorry!

I am linking up with Metamorphosis Monday, Allergy Free Wednesday and these other Awesome Parties.


Tuesday, August 7, 2012

Ice Cream Sundae Cupcake Tute


I know that baking cupcakes in ice cream cones is not new information.  I have seen different versions of it for a while now on the internet.

I tried making them a few years ago and they didn't turn out so good.  They were sort of flat or ever so slightly domed.  They were always a disappointment.  They never looked good decorated.

Then I tweaked the baking technique.  I went upside down.

Here are the steps.

Mix up your cupcake batter.  I used Duncan Heins.

Spray your cupcake pan with cooking spray.

Fill your cupcake pan about 1/2 to 2/3 full.


Easy peezy.  Now turn your cupcake cones upside down.

 Bake at 350 degrees for 18 to 20 minutes.

One of the great advantages to this technique is that you don't have to worry about any of the batter filled cones toppling over on the way to the oven.  I hated that.

When they are finished baking, let the pan cool for a few minutes on a cooling rack.  Then you can lift them out and you will have this:


Doesn't that look pretty? .... and easier to decorate?


If you have any little nubs like in the picture above, just use a knife and slice it off.  Icing will cover all ills.

Ice the cupcake cones with butter cream.  Drizzle on some Magic Shell.  Add some sprinkles and a cherry on top!  Look what you got!  Put these in the fridge for just a few minutes so the Magic Shell will harden. 

When these are being made, I need to move fast!  All the little Beanes heard me getting out sprinkles and came running.


String Beane loves these.  It is nice to have an ice cream sundae looking option when you are allergic to milk.  (Notice little Jelly Beane's face?  She thought he was taking hers away.)  


 Butter Beane has inherited my sweet tooth.  It is one of the many things I love about him.


 My sweet Jelly Beane woke up from her nap and came running at the smell of cupcakes.  

These cupcakes freeze beautifully too!  Just freeze them in a zip lock bag.  When you are ready to eat them.  Just take them out of the freezer, ice them and decorate.  Then you have an impressive dessert on a moments notice. 


I am linking up with Metamorphosis Monday, Allergy free Wednesday and these other Awesome Parties!

Tuesday, July 24, 2012

The Best Pound Cake ~ Allergy options

You know you are an allergy mom when you figure out how to make a pound cake without milk/dairy!

Mr. Homegrown's brother came a few weekends ago to help us move, so I made a pound cake for dessert one night.  As a general rule, I do not make anything for our family that String Beane cannot eat.  So I substituted the milk ingredients in the recipe to make it safe for everyone.  The results were amazing!

This pound cake was delicious!  My favorite part of pound cake has always been the crust.  The crust on this pound cake was so good.  It was crunchy and delicious.

Everyone loved this cake.  String Beane ate A LOT of it!  That always makes me happy since he is so hard to please.

Here is the recipe I used and what I substituted to make it milk free.

Ingredients
2 sticks of butter, melted (I used Flieshman's unsalted margarine, it is milk free)
1/2 cup oil
3 cups flour (I used All Purpose)
3 cups sugar
6 eggs
1 cup of milk (I used almond milk)
1 teaspoon baking powder
2 teaspoons of Vanilla extract

Directions
Preheat the oven to 325 degrees.

Combine the flour and baking powder in a separate bowl.

In a mixer, cream the sugar and butter and oil until fluffy.
Add the well beaten eggs and beat until combined.
Add in the flour and milk, alternately, until well mixed.  Begin and end with the flour.

Add the Vanilla and give it one more mix.  

Spray a bundt pan with baking spray and pour in your batter.

Bake for 1-1 1/2 hours at 325 degrees.  Check with a cake tester.

Let the cake cool on a cooling rack and then turn out on a platter.

There is really no way to go wrong in eating this cake.  Slice it and eat it plain.  Serve it with strawberries and whipped cream.  Serve it with some berry compote drizzled on top.  Slice it and toast it for breakfast!

I am linking up with Metamorphosis Monday, Allergy Free Wednesday and these other Awesome Parties!


Tuesday, July 17, 2012

Chocolate Butterscotch Crescents


Sometimes it is the simple ideas that are the best. 

And this is a simple and easy dessert/breakfast idea. 

We have been in the middle of a move.  It has been so much more difficult than I had imagined.  Horrible really.  I needed some easy and simple in my life. 

So, here is the easy and simple dessert.

Ingredients
One tube of Pilsbury Crescent Rolls
Semi sweet chocolate chips, I used Gharidelli because they are milk free
Butterscotch chips, I used Food Lion brand because they are milk free
Powdered sugar

Directions
Preheat the oven to 375 degrees.
Unroll the crescent rolls and separate into triangles.
Place a tablespoon of semi sweet chocolate chips and a tablespoon of butterscotch chips on the crescent roll.
Roll them up and place them on the baking sheet.
Bake for 11-13 minutes.

Mix up some simple icing glaze.  This is sort of an 'eye ball it' situation.  Put about a 1/4 cup of powdered sugar in a bowl.  Add 1 teaspoon of water at a time and give it a stir until it is the consistency you want. 

When the crescents come out of the oven, let them cool for a few minutes, or as long as you can stand it.  Drizzle the powdered sugar glaze over the tops of them. 

They sort of have doughnutty taste to them.  This is totally worth the very little effort that they took. 

My little Beanes ate them up.  I ate two of them up. 

These totally hit the spot with a cup of coffee!

Feel free to adjust the ingredients to your tastes.  I think these would be good with some peanut butter and chocolate chips.  I used all ingredients that were milk free so my String Beane could eat them. 

I am linking up at Metamorphosis Monday, Allergy Free Wednesday and these other Awesome Parties!


Saturday, May 19, 2012

Peanut Butter Cup Brownie Bites


I am almost certain that ,thanks to Pinterest, I can pull off almost anything on a moments notice.

Or at least I think I can.  On that note, the biggest problem that I see with Pinterest, is that so many people are on it.  I mean when you think you are all creative and make something to go to a party, people will say 'oh, I saw that on Pinterest'.  Sort of takes a little something away. 

Anyway, we were invited to a pool party last night.  Whenever we are invited anywhere, the biggest dilemma I have is making sure there will be food that will be safe for String Beane's allergies.  I had the dinner part all planned out, but dessert had escaped my attentions.  Enter Pinterest.

I saw this post by Cookies and Cups and thought it would be easily adapted for milk allergies.  I pinned it. So, about 2 hours before the party started, I started working on a dessert to take. 

I made these cute little Peanut Butter Cup Brownie Bites.  They were GOOD!.  They were simple and they were fast.  And, I made them without milk!

Ingredients
One box of Duncan Hines Chewy Fudge brownie mix and ingredients called for on the box. (This is milk free)
1/2 cup butter, room temp (1 stick) (I used Fleishmann's unsalted margarine - milk free)
1 cup creamy peanut butter
6 cups sifted powdered sugar
1/4 cup milk (you can add more if your prefer a creamier frosting) (I used Almond milk)

Optional Garnish of chopped peanuts and chocolate syrup.

Directions
Start by preheating the oven to 350 degrees.
Mix up your brownie mix according to package directions.
Line a mini muffin pan with pretty cupcake liners and give it a spray with cooking spray.
I used a cookie scoop to fill the cupcake liners about 2/3 full.
Bake for 12 minutes.  I wanted these to be a little gooey, so do not over cook.
Allow to cool for about 10 minutes and then move them to a cooling rack and let completely cool.

While the brownies are cooling, make your frosting.
Dump the margarine, peanut butter, powdered sugar and almond milk in a bowl and beat with a mixer until smooth and fluffy.  Add more milk if you needed to make the frosting the consistency that you like. 

When the brownies are cool, pipe some frosting on the top of each one and look at your pretty work.

Garnish with some chopped peanuts and a drizzle of Hershey's Syrup.   If you have any leftovers, store them in the fridge. 

Take one more look at them.


They are so good.  Make yourself some. 

I am linking up with Metamorphosis Monday, Allergy Free Wednesday and these other Awesome Parties.

Sunday, May 6, 2012

Strawberry Cobbler


Mr. Homegrown had a birthday last week.

I asked him what he wanted for his birthday dinner and dessert.

He chose hamburgers and onion rings for dinner and he 'couldn't think of anything for dessert'.

Dessert is pretty much all I do think about.  He needs me.

He said that he did not want a cake.  Huh?  He finally decided that he did want a strawberry cobbler.

No problem.  I can make that and it can be milk free for my String Beane.

This has been a cobbler recipe that I have used for years and it is a good one.  I actually like it best with peaches.  But since it wasn't my birthday, we did strawberries.  You can make this with any fruit you want, fresh is best but frozen will do.

Ingredients
1 pint of fresh strawberries, washed and cut
1 cup of Bisquick baking mix
1 cup of sugar
1 egg
1 stick (1/2 cup) margarine, melted (we used Fleishman's unsalted since it is milk free)

Directions
Preheat oven to 350 degrees.
Put your strawberries in a 9x9 Pyrex dish.
In a separate bowl, mix the Bisquick, sugar, and egg.  This will be a course mixture.
Sprinkle the Bisquick mixture all over the strawberries.
Pour the melted butter all over the top. 

Bake for 30-35 minutes.  Check to see if the top is browned off the way you like it.  Bake it a little longer to get the look you want if you need to. 


When it comes out of the oven, let her cool for at least an hour.  Fruit gets really hot.  You will burn your mouth if you take a bite soon!

Serve it up with some whipped cream, ice cream or just naked!  I have been known to eat this fro breakfast since it has fruit and everything. 

Happy Birthday Mr. Homegrown!

I am linking up at Metamorphosis Monday, Allergy Free Wednesday and these other Awesome Parties!

Friday, April 20, 2012

Reese Cup Cake


I love Reese Cups!  My jeans do not love Reese cups.  It is an unfair world. 

I try not to have snacks in the house that contain milk for a couple of reasons.  The most important reason is that I need my house to be safe for String Beane.  I don't want him to accidental eat something that has milk in it and react.  The second reason is that if I do have a snack here that has milk in it, like Reese cups, then I am the only one that can eat them.  So I eat them.  Then my jeans get really tight.  Or more tight, I should say. 

I found these mini cake pans at Michael's and I bought them not knowing what I was going to do with them.  Then one night a craving for a Reese cup hit me so I made these wonderful things.  They do not contain milk so I was not forced to eat the whole batch to keep my home safe! 

The bonus is that all the little Beanes loved them!  We got to share the goodness of these little cakes.  So these are basically diet food. 

Ingredients
One box of Duncan Hines chewy fudge brownie mix
ingredients to make the brownies
1/4 cup plus 1/8 cup butter, melted (Flieshmann's unsalted margarine is milk free0
2 cups of powdered sugar
3/4 cup creamy peanut butter
1/2 teaspoon vanilla extract
Chocolate Frosting, (Duncan Hines chocolate frosting does not have milk, yea!)
Preheat oven to 350 degrees.

Mix the margarine, sugar, peanut butter, and vanilla in a mixer until well combined. 

Follow the directions on the brownie mix to make the brownie batter. 

Spray the mini cake pans with cooking spray.

Fill the mini cake pans about 1/2 full with the brownie batter and bake for 15 - 18 minutes.  Keep an eye on these to make sure you don't over bake them. 

When you take them out of the oven, let them cool for a few minutes in the pans and then pop them out on to a cooling rack to cool completely. 

When the cakes are completely cooled, grab two of them and get to filling.  You may want to level the cakes a little if they domed up on you while baking. 

Fill the cakes little cavities with the peanut butter mixture.  I used a little cookie scooper to fill mine. 

Use an offset spatula and run a thin line of frosting around the edges of the cakes.  Sort of like a little bit of chocolate glue.  Stack the two cakes together to make a filled cake. 

Then ice the whole thing with frosting.  and you get one of these.


Then slice the little cake open and revel the peanut butter surprise!

You will not be disappointed in these.  I was able to make three filled cakes with this recipe.  There was a little bit of peanut butter mixture left over, so I ate it.  You know 'waste not, want not'.  My mama taught me that. 

I am linking up with Metamorphosis Monday, Allergy Free Wednesday, and these other Awesome Parties.


Saturday, April 7, 2012

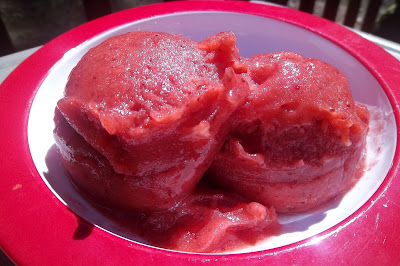
Strawberry Sorbet


When you have a milk allergic child, you will come to worship sorbet. 

A lot of ice cream parlors will offer one or two flavors of sorbet.  The great news is sorbets are made of fruit and sugar.  No milk.  Yea for Sorbet!

We live near several strawberry patches where you can take your kids and pick your own strawberries.


My little Butter beane in 2010 eating picking strawberries!


They are all starting to open for the season! 

I had some strawberries in the freezer, so I decided to give Sorbet a shot.

Glad I did.  My little Beanes love it.


Ingredients
1 pound of strawberries, fresh or frozen
1/2 cup of sugar
1 Tablespoon of lemon juice

Directions
Give the strawberries a few rounds in the food processor.  Make sure they are good and pureed. 
Stir in the lemon juice and sugar until the sugar dissolves.  Give it a taste to see if you want to add a little more sugar or not. 

If you are using frozen strawberries, go ahead and put in your ice cream freezer and churn, according to manufacturers directions.  If you are using fresh strawberries, put the pureed mixture in the refrigerator for about 2 hours before transferring to your ice cream freezer.  

This is best eaten as soon as you make it.  If you have any left over, just pop it in a plastic container and keep in your freezer.   

Here is one more look at it.  Delicious.


I am linking up at Metamorphosis Monday , Allergy Free Wednesday, and These other Awesome parties!

Wednesday, March 14, 2012

Pi Day Pecan Pie


Today is March 14th or 3.14 for short. 

That means it is Pie Day.  Remember geometry?  This symbol Ï€ means something to someone in the math world.  All I remember is it is 3.14.

I was not a horrible math student.  I was just quick to rule out what I thought wouldn't be useful in later life.

I was correct about most math.  I have never used Ï€ since I finished geometry.  So, up until now, that was some useless information for me. 

Someone should have explained to me about how this little symbol, Ï€, could translate into some yummy dessert.  That would have made me pay more attention. 

And I have seen some of the cutest baby clothes that say "Cutie Ï€".  I really think that math teachers should really have explained to me the real value of Ï€.  Desserts and shopping I understand.  Math scores could really go up with this information.

So, in honor of Pie Day, I am giving all you mathletes a Pecan Pie recipe.  Here you go.  You are welcome.

Ingredients
1 pie crust, unbaked
1 cup white sugar
3 Tablespoons brown sugar
1/2 teaspoon salt
1/2 cup dark Karo Syrup
1/2 cup light Karo Syrup
1 teaspoon vanilla
1/3 cup melted butter (Flieshmann's unsalted is milk free)
3 eggs, beaten
1 cup pecans, chopped  slightly

Mix up your sugars, salt, Karo syrups, vanilla, eggs and melted butter in a bowl.

Pour your chopped pecans in the bottom of the pie crust. 

Pour the syrup mixture over the top.  Cover the top and crust loosely with foil.  Bake at 350 degrees for 30 minutes.  Remove foil and continue baking another 30 minutes. 

Watch your crusts.  If it starts to get too brown, recover with foil and continue baking.  Your pie should not be too jiggly when it is done. 

Cool pie completely before serving. 


Happy Pie Day!

I am linking up with Metamorphosis Monday and these other Awesome Parties!


Wednesday, January 4, 2012

Lemonade Cake

I finally made a winner!  My little Sting beane is so hard to cook for.  First, he has a sever food allergy to milk.  That, in and of itself, is very hard to work with.  The second reason he is hard to cook for is that he does not care about food at all. 

This is something I dont' get.  I love food.  Everything I do revolves around food.  Where we will eat.  What I will cook.  What do they have for dessert.  All the key questions.  None of this matters to String beane.  He is totally unimpressed with food.  So it is pretty much a bummer to cook for him. 

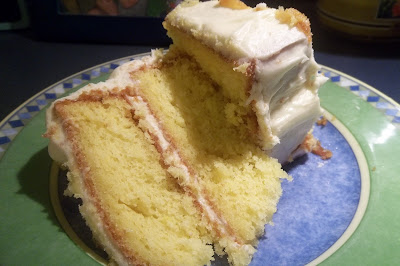
Monday we had some family come visit so I made a new cake recipe.  Lemonade cake!  What do you know?  String beane liked it so much, he asked for seconds and then actually asked for a piece of Lemonade Cake for the next day!  This is a bonanza! 

Here is the magic cake recipe.  It is adapted from two different recipes I found online.  I made them milk free for our family.  Feel free to use regular cow milk in the recipe.  I am sure it would be wonderful.


Lemonade Cake

Ingredients
1 Lemon boxed cake mix (I used Duncan Hines)
4 eggs
1 1/4 cup milk (I used Almond Milk)
1/3 cup vegetable oil
2 Tbsp Lemonade from concentrate 
Glaze: 
2 Tbsp Lemonade from concentrate
1 cup powdered sugar
1 Tbsp water

Directions
Preheat oven to 350 degrees. 
Spray 2 8″ round cake pans generously with cooking/baking spray.
In mixer beat all your ingredients on low for 30 seconds and then on medium for 2 minutes.
Keep the remaining frozen lemonade concentrate in the freezer…you will need it again.
Bake according to package directions (I baked for approx 30 minutes) until cake is set and toothpick comes out clean.
Let the cakes cool in pan…about an hour. Do not remove.
When the cakes are cooled level them off so they are flat on top.

Poke holes in the cake with a fork.  Make your glaze.  In a bowl, mix the Lemonade concentrate, powdered sugar, and water.  Pour the glaze equally over the cakes, still in the pans.  Wrap with plastic wrap and put in the refrigerator overnight. 

Frosting Ingredients
1 lb confectioners sugar
1/2 cup (1 stick) unsalted butter, softened (I used Fleishman's Unsalted Margarine -Milk Free)
3 tablespoon frozen lemonade concentrate

To make the frosting, beat together sugar and butter until fluffy. Beat in the remaining ingredients until combined.
Transfer one cake to a cake stand or large platter. Using an offset spatula, spread the top of the cake with a layer of frosting. Place the second cake on top of the first. Spread the remaining frosting over the top and sides of both layers. Slice and serve.

I could not believe how good this cake was!  It was so refreshing and cool tasting.  It did not make me feel like I was already breaking my resolution.  Oh, Well!

I am so happy the my String Beane liked it so much.    Make yourself some.  You won't regret it!

I adapted this recipe from Cookies and Cups and also the Deen Bros. recipes.

I am linking up at Metamorphasis Monday and theses other Awsome Parties!


Wednesday, November 16, 2011

Pumpkin Patch Treats


Soccer season is over and we just had an end of the season soccer party for String Beane's team.  My job was to bring a dessert.  

I really did not want to make another trip to the store for any ingredients.  So I just pulled something together with what I had on hand.

I think they turned out cute.

I used Duncan Heins chewy fudge brownie mix and made brownies in a muffin tin.  Then I frosted them with the famous Crisco butter cream, tinted green.  And I stuck on a pumpkin candy that we had left over from Halloween.


Then I used some Pillsbury sugar cookie dough and made the cookies, according to the package.  Slice and bake.  I had some orange frosting, Crisco style, left over from Halloween.  I piped on the frosting in a swirl and then used some of the green frosting to pipe leaves and vines.
The little soccer team loved them.  I loved them too.  It was a win, win.  And a great way to use what I had on hand to make something special for my String Beane! 

I am linking up again at Metamorphasis Monday
and these other awesome parties!

Wednesday, October 19, 2011

Copycat Krispy Kreme Doughnuts ~ Adapted

I am linking up at Metamorphasis Monday
and these other Awesome Parties!


I used to love to buy doughnuts in the grocery store.  I was single and lived alone so there wasn't even a need to hide them. 

Then I met  Mr. Homegrown.  He grew up in Winston Salem, home of the Krispy Kreme.  He changed my life.  He introduced me to the Hot Now doughnut at Krispy Kreme.  Nothing has been the same since.  I no longer buy doughnuts in the grocery store.  Why bother?  They are nothing like a good Hot Now doughnut from Krispy Kreme.  There are no words to really describe how yummy and heavenly a Hot Now doughnut is from Krispy Kreme.  If you have not tried one, go get one.  Sit in the parking lot and wait for the big red "Hot Now" sign to light up and run in there and get you some.  You will be forever changed.

Since String Beane was diagnosed with severe a milk allergy when he was 7 months old, I think I have read every ingredient label there is!  I have not found a doughnut yet that does not contain milk.  It is sad really.  Poor guy does not know what he is missing.  I ran across this recipe for copycat Krispy Kreme doughnuts and knew I wanted to give it a try.  I modified the recipe to milk free ingredients so it would be safe for my little beane.  I will list the recipe in the original state and just tell you what I substituted.  They really were delish.  They will not put Krispy Kreme out of buisness or anything, but they are worth your time to make.

Ingredients
2 pkgs. regular or rapid rise yeast
1/4 cup warm water
1 1/2 cups lukewarm milk (I used Vanilla Soy Milk)
1/2 cup sugar
1 tsp. salt
2 eggs
1/3 cup shortening
5 cups all-purpose flour
Vegetable oil

Creamy glaze (or chocolate glaze) - recipe below
Directions
Dissolve yeast in the warm water.  Add milk, salt, eggs, shortening, sugar and 2 cups flour. Beat on a low speed for 30 seconds, scrape the sides! Then beat on medium for 2 minutes, making sure to scrape occasionally.  Stir in remaining flour until smooth.
Cover and let rise for 50 to 60 minutes or until doubled.
Roll out on a lightly floured surface to 1/2-inch thickness.  
Cut into donuts. Cover and let rise for 30 to 40 minutes.  Heat oil (I used a skillet) to 350. Add donuts in batches and fry until golden brown on both sides.  
Remove and drain on a paper towel.   Then dip into glaze (if you do chocolate, let them cool after the creamy glaze and spread chocolate glaze on top).  
Creamy Glaze Recipe

Ingredients
1/3 cup butter (I used Fleishman's Unsalted Margarine)
2 cups powdered sugar
1 1/2 tsp. vanilla
4-6 tbsp. hot water

Directions:
  1. Melt butter in a saucepan, then remove from heat.
  2. Stir in sugar and vanilla.
  3. Then add water, a tablespoon at a time, until you get the consistency you want. (If you do chocolate glaze, you add in melted chocolate as well).
This makes a ton of doughnuts!  Next time I will cut the recipe in half.  The glaze on these doughnuts is wonderful.  I am trying to think of what else I can use that on!  If you can think of something let me know.

All the little Beanes like the doughnuts.  None of them were overly impressed though.  I blame it on the fact that they have never really eaten doughnuts before and were just in some sort of shock.  Whatever.